Showing posts with label free bus ikea nyc. Show all posts

Tuesday, September 16, 2008

Assembly Required.........

Today, my old desk got kicked to the curb. The hutch part fell over this morning, knocking everything off into a heap with a massive crash. Nice way to start a Monday morning.

Anyhooo….

I paid a visit to my BSF Best STORE Forever), Costco this afternoon and bought a shiny new one. It’s dark brown and matches our bedroom furniture and it’s lovely. There were two VERY heavy boxes and the label said “some assembly required”. Ha. More like “one million tiny bits to separate and try to put together”!

After Joe and I lugged those suckers upstairs and dragged the old desk pieces downstairs, I began my assembly…pffft. I got to step 2 (of 26) and lost my patience. I couldn’t for the life of me figure out how numbers 32 and 33 fit together. There was a diagram AND written instructions, but I just.couldn’t.get.it. Sigh. I looked at the clock and it was 2:45. Nice. Frankie would be home in 20 minutes. He ROCKS at this crap.

At 3:10, Nicholas comes in, sans Frankie. Crap. Cross Country tryouts started today. Frankie wouldn’t be home until 3:45. Crap. Crap. Crap.

I made a couple of business phone calls (from my office floor, with no desk) and FINALLY, Frankie arrived. I called him upstairs immediately. Poor kid didn’t even have a chance to grab a snack. Luckily, he advised me that he had no homework (except for Kumon) so I chained him to my bed asked him kindly to please help. He took one look at parts 32 and 33 and put them together. Little turd.

He then proceeded to put the desk together, methodically, piece by piece. That kid is amazing. He hardly even needed the instructions. We stopped at 5:30 for dinner and then he was back at it, this time with a little help from Joe…well, Joe just did what he was told by Frankie…and by 7:00, I was putting all my books and pens into my new cupboards and drawers.

Julian was extra-tired tonight because he woke from his single nap at 1:00…usually he either takes two naps or he goes down later for his one nap, but he was out and about with Joe and his Mom today, so I ran out of time to put stuff away…it’s just piled on my desk now. Sigh. Busy day tomorrow.

In other news, tomorrow is our School Council AGM…that means that it’s my last meeting as Chairperson. Praise.the.Lord. It has been really hard for me to deal with a baby, a full time job, two older boys AND being Chair of the School Council. I totally bit off more than I could chew with that! But, I think I made a difference. I did my best and I really think I did a pretty good job. Heck, at our school, stopping the parents on Council from killing each other is the main objective!!! So far, everyone is still alive and kicking…knock on wood.

Finally, this post is my 999th. Nine hundred and ninety-nine posts. Wow. That’s alot of blogging. I hope you have enjoyed them as much as I have enjoyed typing them. I also hope you will be here for my NEXT 999!

Toodles.

Compliments of www.mywhinecellar.com

Monday, September 1, 2008

Installation of Kitchen Cabinets from Start to Finish

I would like to tell everyone that I am very sorry for our absence from posting on the blog but due to changes within the company which included the expansion of our company we had to make decisions on what was more important at that time. However, I strongly believe that our readers are very important and now that we have hit calm waters I will begin to post on a regular basis on subjects that are interesting, informative, and helpful. I would love to hear from other people in our profession of construction, handyman, or assembly services that would like to be a regular contributor to our blog and our new newsletter we hope to launch in the near future.

Christopher C. Purnell


Reprinted with permission from Journal of Light Construction, January, 1999.

by Carl Hagstrom
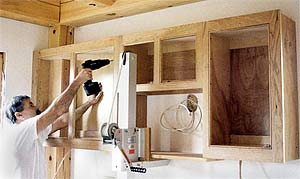


I install about a dozen high-end kitchens a year, and have developed a system that prevents frustrating and costly backtracking. Since no two custom kitchens are the same, I have to tweak my approach to fit each situation, but many tasks I perform remain the same regardless of the kitchen.

Plumb Walls Are An Installer’s Best Friend
In my experience, the primary concern of most carpenters when they approach a kitchen installation is to find out if the floor is level. But what about walls that are plumb and square? I’ve found that in the overall scheme of cabinet installation, the order of importance is: plumb, square, and level.

When walls are plumb, I can make good time. I position the cabinet in place, screw it to the wall, and move on. When walls are not plumb, I’m forced to fuss with shims. Judging the right amount of shim to shove behind a cabinet is a matter of trial and error. I take my best guess, suck the cabinet tight to the wall, check for plumb, and then loosen the screws and adjust the shim until the bubble falls between the lines. It’s not difficult, but it is tedious.

Walls that lean away at the top are the most problematic — you have to shim the tops of the uppers, which is a tough reach. When a wall leans in, I can hang the upper from the top rail, then slip shims behind the lower portion of the cabinet.

Base cabinets can be even tougher in this situation. If the wall leans out, the base cabinet is forced out of plumb when it’s drawn tight to the wall. You then loosen the screws, the cabinets drop from the line, you cuss and swear, and then try and hold the cabinet to the line while gauging how much shim has to go in behind it. And then there’s a gap at the exposed end of the run where the plumb cabinet meets the out-of-plumb wall. This must be covered with a molding or a scribed end panel.

Square walls.
If a prefabricated laminate countertop is specified and the plan calls for an inside corner, I pay close attention to the squareness of the walls. Prefab counters that are mitered for inside corners install square. If the walls are out of square, there will be a gap where the backsplash meets the wall.

In production work, this gap is closed off with a molding. In higher end work, this is often unacceptable. Prefabricated counters can be special ordered to fit an out-of-square condition, but lead times are long.

Levelness affects appliances.
When the floor is out of level, I typically start the layout from the highest point. Many appliances won’t fit in their opening if the counter is less than 34 1/2 inches above the finished floor. Starting at the high point usually avoids this problem.

Laying Out Cabinet Locations
At any rate, the first things I check are the walls. I prefer to use a 4-foot level for this process (see Figure 1). Unlike a construction laser, my bubble stick lets me know right away when there’s a hump or bulge in the wall or floor. To those who argue that a 4-foot level isn’t accurate enough, I counter that accuracy is relative. A kitchen must be straight and flat — being 1/4 inch out of level overall will seldom affect the job. My goal is to find the high point of the floor and work from there. That way, I know right away if I’ll be working late.
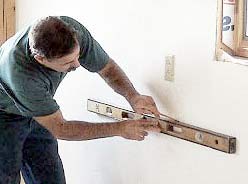
Figure 1. While a helper unloads the truck, the author uses a 4-foot level to check the walls and floor. A level is better than a construction laser for finding bumps and dips in the wall — and plenty accurate for a kitchen installation.


After sizing up the walls and floor, I draw a level line on the wall at 34 1/2 inches from the highest spot on the finished floor (Figure 2). If the finished floor hasn’t been installed, I add its thickness (plus any underlayment) to the 34 1/2-inch dimension. Since most countertops are 1 1/2 inches thick, setting base cabinets to this height results in a finished counter height of 36 inches. Then I measure up 19 1/2 inches from this line, and draw a second line, which represents the bottom of the upper cabinets. If these dimensions seem at all confusing, just remember that finish counter height is 36 inches, and the distance between the counter and the upper cabinets is 18 inches.

Next, I mark out all the upper and lower cabinet locations on the walls. These aren’t precise layout marks, but they let me size up the cabinet placement, and review the layout for potential problems.
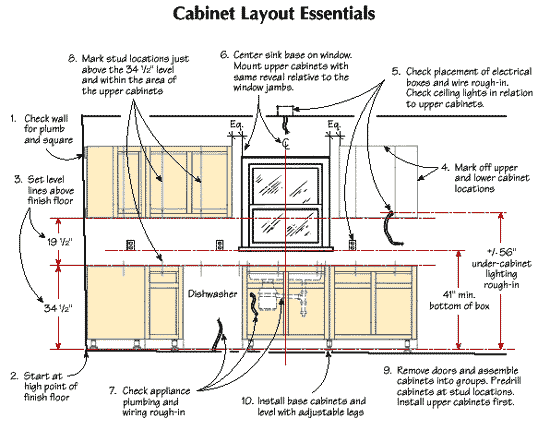
Figure 2. One hour spent laying out the job can save many hours of backtracking later. Check walls for plumb and square, and floors for level. Locations of all cabinets, plumbing, and wiring must be verified, and every cabinet should be checked against the plans — before installation begins.


Electrical placement.
The most common snafu I encounter is improperly placed or missing outlets and switch boxes. Moving or adding a device box before the cabinets are installed isn’t so bad — the “hack tracks” in the drywall can be easily hidden behind the cabinets.

The bottom of a device box should be at least 41 inches from the finished floor, and the run of device boxes should be level. If the electrician measured from an out-of-level subfloor when he set the boxes, they’ll need to be relocated. I also check for an outlet where the refrigerator is located, and for a feed wire for the exhaust hood. Unless the joists are open below, the feeds for ranges, ovens, dishwashers, and garbage disposals should be in place as well.

I also check the layout of any ceiling or soffit lighting. These lights are typically placed 16 inches or so from the wall, and can present a problem if they fall within the area of a 24-inch-deep overhead refrigerator cabinet, wall oven, or pantry.

Checking for symmetry.
The majority of kitchens I install have a sink base that’s centered on a window. In these situations, I use my layout marks to verify that the cabinet will end up centered, and that the upper cabinets on either side of the window will show the same reveal relative to the window jambs.

Proper piping.
I check that drain lines, supply lines, and toe-kick heaters are located properly. Finally, I use an electronic stud finder, and mark where all the studs are. I draw vertical stud lines within the area of the upper cabinets, and place a mark just above the 34 1/2-inch base cabinet level line.

The entire layout process takes about an hour, and once completed, allows me to focus on installing. My helper unloads and sets up tools while I do the layout. The last item on my list is verifying that all the cabinets are on site, and that they match the plan dimensions.

The Easy Way to Hang Cabinets
I’m not lazy, but I don’t like working any harder than I have to. I try to do as much work as possible before the cabinets are hung. As soon as the cabinets are unloaded, my helper or I remove the cabinet doors. Many of the doors must be removed for clamping purposes, but more importantly, it eliminates the risk of a door being damaged as the cabinets are installed.

Uppers first.
I always install upper cabinets first. They’re easier to install when I don’t have to reach over installed base cabinets, and there’s less chance the base cabinets will be damaged. I lay the uppers on their backs on the floor, and assemble them as a group (Figure 3). I clamp the face frames together, drill pilot holes, and then screw the face frames together. When the entire “block” of cabinets is fastened together, I lay a straight-edge on top of the face frames, then shim between the floor and the backs of the cabinets until everything is flat. Then I shim the spaces between the sides of the cabinets and run screws through the sides at the back of the cabinets to lock them together as a unit.
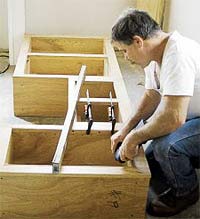
Figure 3. The author assembles the upper cabinets on the floor as a unit, shimming from the back until the fronts are straight and flush. Note the level used as a straightedge.


I use Fuller countersink bits (W.L. Fuller, P.O. Box 8767, Warwick, RI 02888; 401/467-2900) to drill all the pilot holes. They’re inexpensive (around $5 each), use standard twist drill bits, and are easy to adjust for length. I use square-drive screws (McFeely’s, P.O. Box 11169, Lynchburg, VA 24506; 800/443-7937) for all fastening chores. The square drives have a thicker shank than drywall screws (less chance of snapping them off when working with hardwoods), and the screw heads don’t strip out as easily as Phillips head screws.

Predrilling for stud locations.
After I’ve fastened the cabinets together, I stand them up and lay out the studs on the back of the cabinets (Figure 4). I then drill from the back of the cabinet through the hanging rail (at the stud lines), until the drill bit just pokes through to the interior of the cabinet. I finish the pilot holes by countersinking from inside the cabinet. This method is much more foolproof than laying the pilot holes out from the interior of the cabinets, since it eliminates the need to deduct for cabinet sides.
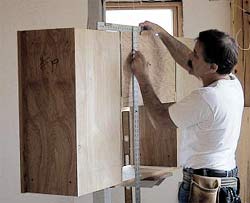
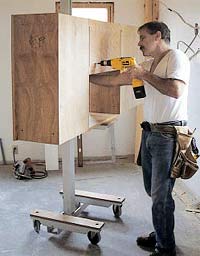
Figure 4. Marking stud locations on the backs of cabinets is easier than marking them inside (top). The author predrills holes for the mounting screws from the back (bottom), then finishes up with a countersink bit from the inside.


My next step is to get the block of cabinets in position on the wall. About two years ago, I was introduced to an amazing tool: the Gil-Lift (Telpro, Rt 1, Box 138, Grand Forks, ND 58201; 800/441-0551). This is a dedicated cabinet lift that allows me to lift up to 300 pounds of cabinets single-handedly and roll them into place. The lift mast removes easily from the dolly, which I use to move base cabinets around. Forget the leveling lasers: If you install any kitchens at all, a Gil-Lift is one tool you shouldn’t be without. I figure it took me about four kitchens to recoup the $475 cost of this lift.

If you don’t have a cabinet lift, then the size of the block of cabinets you assemble will be determined by the number of people available to help lift the assembly in place. Before I had a lift, I would fasten temporary supporting brackets to the wall. With these brackets, I could fasten the block of cabinets to the wall without the need for an extra pair of hands to hold them up.

Undercabinet lighting.
At this stage, if there is any undercabinet lighting, the feed wires must be fed through as the cabinets are positioned. A good electrician will leave a loop of wire 56 inches above the finished floor. It’s better to locate this wire too high rather than too low. I cut a trough through the drywall and lower the wire to its proper height (Figure 5). If the wire is too low, the wall will have to be patched after the wire is raised. I drill a 5/8-inch hole in the back of the cabinet just below the bottom shelf and feed the wire through as the cabinets are lifted in place.
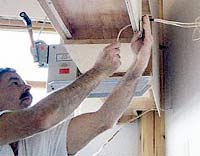
Figure 5. Wires for under-cabinet lights are roughed in at a safe height behind the wall cabinets. The author then slices the drywall to bring the wire down to the correct height at the bottom of the cabinet.


Base Cabinet Basics
When all the uppers are in place, I install the base cabinets. Base cabinets come in two flavors: those with integral bases forming the toe kick and those without.

Base cabinets with integral toe bases are typically moved into position, the face frames are fastened together, and the rear hanging rails are held to the level line and fastened to the studs. Then the cabinets are leveled front to back using shims slipped under the toe bases. If you didn’t establish your layout line from the floor’s high point, you’ll be hacking away at these integral toe bases to adjust the cabinet to the rising floor.

Most of the cabinets I install do not have toe bases. Originally, the cabinetmaker I work with supplied plywood base frames that the cabinet boxes would sit on. I would level the toe base frames, set the cabinets on top, and screw the hanging rail to the studs. This made for a lot of work on my knees, and if the cabinet needed to be shifted left or right, the locked-in-place toe frames often had to be relocated. After rethinking the process, I now use adjustable feet called leg levelers. They fasten to the underside of the cabinet, and the threaded portion of the foot is extended or retracted by turning the base of the foot (Figure 6). The leg levelers we use cost about $1.50 each. They’re made by Camar and are available through kitchen component suppliers.

A typical kitchen might require $50 to $60 worth of leg levelers. The additional cost is more than offset by the elimination of the toe frames, and the labor savings when leveling the cabinets. Finish toe boards attach to the feet with spring clips, and can be removed to access wires or piping.
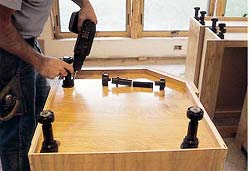
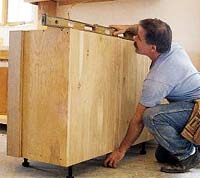
Figure 6. Plastic leg levelers (top) speed the task of leveling base cabinets (bottom). Finished toe kicks attach with metal clips — or can even be screwed directly into the plastic legs, according to the author.


New Clamp in Town
Aligning and clamping face frames can be tedious. For years, I’ve used Bessey clamps for this task (American Clamping Corp., P.O. Box 399, Batavia, NY 14021; 800/828-1004). Their smooth action makes for a first-class clamp. I’ve recently added a new clamp to my bag of tricks, a dedicated face-frame clamp called the Cabinet Claw, by Pony ($50 per pair, from Adjustable Clamp Co., 417 N. Ashland Ave., Chicago, IL 60622; 312/666-0640). This dual-action clamp simultaneously pulls the face frames together and flushes them up (Figure 7). While these clamps can’t replace my Bessey clamps for every task, for face-frame work they’re well worth the cost.
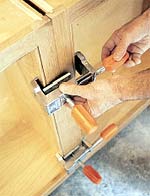
Figure 7. Pony “Cabinet Claws” are the newest weapon in the author’s installation arsenal. They draw the cabinets together and keep the face frames perfectly flush at the same time, acting like an extra pair of hands.


Carl Hagstrom is a contributing editor for the Journal of Light Construction, and a builder in Montrose, Pa.

Reprinted with permission from Journal of Light Construction, January 1999. Subscription information can be found at their website: www.jlconline.com.


Have you reviewed the related Knowledge Base areas below?
  • KnowledgeBase: Cabinetmaking

  • KnowledgeBase: Cabinetmaking: General

  • KnowledgeBase: Cabinetmaking: Installation

  • KnowledgeBase: Cabinetmaking: Residential Cabinetry

  • KnowledgeBase: Knowledge Base


  • Would you like to add information to this article? ... Click Here

    If you have a question regarding a Knowledge Base article, your best chance at uncovering an answer is to search the entire Knowledge Base for related articles or to post your question at the appropriate WOODWEB Forum. Before posting your message, be sure to
    review our Forum Guidelines.

    Questions entered in the Knowledge Base Article comment form will not generate responses! A list of WOODWEB Forums can be found at WOODWEB's Site Map.

    When you post your question at the Forum, be sure to include references to the Knowledge Base article that inspired your question. The more information you provide with your question, the better your chances are of receiving responses.

    Return to beginning of article.


    Monday, June 23, 2008

    One Local businessman welcomes Brooklyn Ikea with open arms

    Christopher Purnell, President & Founder of EZ Furniture Assembly & Interior Innovations, LLC was happier than a kid on Christmas morning when the Brooklyn Ikea finally opened. Purnell is an entrepreneur who has over 10 years of marketing experience and relocated to New York in search of something besides marketing, but just wasn’t certain what that was. While he pondered his next move the bills continued to come and soon he was forced to find something to tide him over until he found his dream job. Several friends suggested Craigslist where he could find temporary work also known as gigs. Purnell said “Right from the door I noticed all these postings for people wanting someone to assemble their furniture for them. I come from a family that is made up of handymen and construction workers hour days, 7 days a week.” It wasn’t long before he realized what he was searching for had found him. So, he went ahead and opened EZ Furniture Assembly & Interior Innovations, LLC and hired his first helper who is now his project manager, Lawerence Land. Purnell states “we went ahead and got licensed, insured, and built a web site and began marketing our services. It wasn’t long before we had more work than we could handle so we hired more technicians with a background in furniture assembly, repair, or at minimum carpentry skills.” Today Purnell’s company employs a dozen full-time technicians who are certified installers for several manufactures, are required to participate in at least two continuing education workshops per year & meet for a weekly meeting to discuss changes in products, new ideas to improve service, and keep everyone up to date on where the company is at. Purnell himself has obtained a certificate in Project Management, and got his company certified as by the National Playground Safety Council. The company has also expaned its services from just furniture to exercise & recreational equipment, barbeque grills, trampolines, swing sets, outdoor play sets, as well as building custom closets and assembling and installing kitchen cabinetry and works in conjunction with a delivery service that will actually meet the customer at the store and take them home with their purchases for far less than the stores in house service and have their furniture assembled the same day. The company is ranked #1 on both Yahoo & Google, has a 5 star rating on Ikea Fans, and was awarded the “Superior Service Award” by Angie’s List, an independent service that allows consumers to review a company’s rating and reviews from prior customers. Purnell explains “ I believe our success is definitely due to the demand for such a professional service because most of customers work long days, and the time they have they want to spend with family & doing things they enjoy not trying to assemble furniture all weekend. The competition is limited, there are really only two national companies providing the same services but they have forgotten who pays their bills, the customers. Some services that have contracts with a few big box stores have customers waiting 3-4 weeks for an appointment, where our goal is to get an appointment scheduled within 72 hours. I always stress to all my technicians and staff that no matter how many services we provide our most important service is customer service”.

    From what we can see his company has found the recipe for success, and as long as they continue to make furniture requiring assembly his company will continue to grow. EZ Furniture Assembly & Interior Innovations currently serves all of New York City, Long Island, & Eastern N.J.. If you are in need of professional assembly and/or installation services you can visit them online at www.ezfurnitureassembly.com.

    Friday, June 13, 2008

    The Ikea That Never Was

    On a visit to Washington, D.C. many years ago, a slick advertising supplement fell out of my morning newspaper. It was for a store I had never heard of, but immediately wished there was a branch in the New York area. The booklet was filled with the kind of furniture that would appeal to people who appreciated modern design and incredibly low prices, in other words many New Yorkers like me.

    o I celebrate the opening of the city's first Ikea branch in Red Hook, Brooklyn. I had hoped that the store would come first to my home borough of the Bronx.

    Certainly on the surface, the Bronx would be the ideal location for this particular Ikea branch. The ABC Carpet Warehouse store is already here, proving that the borough is fertile ground for this kind of retail operation. And we have plenty of large sites, arguably better transportation infrastructure, and a large pool of labor that is ready and willing to work.

    The store originally was to be built at New Rochelle, in nearby Westchester County. But the plans for it required assembling a huge site that necessitated leveling a handful of homes. This created tremendous opposition to the project in an era when, as the late Senator Moynihan noted, we celebrate those who prevent things from being built rather than those who actually get things constructed.

    As the fight in New Rochelle dragged on month after month it became clear that this development simply would not happen. Finally, the company threw in the towel. Ikea would have to look elsewhere.

    Nabbing Ikea would have been a much-needed shot of adrenaline in the ailing Bronx economy. It even might have attracted some young people to give us a hard look and see that the Bronx is as ripe as Brooklyn as an emerging, upscale place to settle.

    Ikea certainly attracts recent college graduates. Upon my younger son's graduation from college, he cleared the shelves at the Ikea in Elizabeth, N.J., furnishing his brand new apartment in Riverdale. And my older son, now with a growing young family in the Atlanta area, a place that young people have flocked to in recent years, celebrated the opening of an Ikea in a quickly gentrifying section of town.

    Unfortunately, my hopes and aspirations were not shared by those in leadership positions in the borough. The former president of the Bronx, Fernando Ferrer, led the borough through 14 years of economic stagnation. His successor, Adolfo Carrion Jr., has been even more ineffective, especially since his term has coincided with a period of remarkable economic growth in the city.

    The Bronx president controls an entity called the Bronx Overall Economic Development Corporation. When Mr. Ferrer called the shots, the BOEDC was led by his boyhood pal Jose Ithier. During the critical period after the New Rochelle project fell through, they insisted that they were negotiating a deal with Ikea. But when students from the Bronx Beat, a paper that is published by the Columbia Graduate School of Journalism, contacted the furniture company's U.S. headquarters, officials there insisted that there was never any communication between them and Bronx officials.

    Shortly thereafter, the Brooklyn deal was announced, and a golden opportunity for the Bronx was gone.

    As a New Yorker, I'm glad to see Ikea, along with its hundreds of jobs, and infinite purchasing opportunities for bargain conscious consumers here in Gotham.

    I note that northern New Jersey now has two Ikeas — one in Elizabeth and a newer one in Paramus. That gives me hope that with our larger population, and favorable highway access, some future Bronx president who is more concerned and more creative — perhaps the one we elect next year — will be successful in achieving what Messrs. Ferrer and Carrion failed to do. There is room for an Ikea serving the Bronx, burgeoning northern Manhattan, and Westchester, and beyond.

    awolf@nysun.com


    Wednesday, May 7, 2008

    Brooklyn, New York Finally Gets The First IKEA in The CITY!!!!

    Locals who feared the arrival of a branch of the Swedish furniture chain have found IKEA to be a largely tolerant neighbor. NY1’s Jeanine Ramirez filed the following report.

    Seven weeks before their grand opening, employees in Red Hook, Brooklyn’s IKEA are busy reading directions and assembling furniture.

    While the store’s layout is pretty much the same as any other IKEA, the location makes it stand out - it's the first IKEA in New York City and the first on a waterfront – with views of Downtown Manhattan and the Statue of Liberty.

    "It's just the right size. Two, it has that proximity to the population of New York - not just Brooklyn itself but surrounding Brooklyn,” said store manager Mike Baker. “So we think we're dead center in the population that we need to be."

    The store sits on 22 acres along the Erie Basin, and more than six of those acres have been turned into a public waterfront esplanade which IKEA included in its designs to help win over the community.

    Opponents said the big-box store would ruin the character of the neighborhood and attract more traffic than could be handled.

    But Craig Hammerman, the district manager of Community Board 6, said that IKEA has been a good neighbor, listening and addressing concerns.

    "There were certain conditions that the community board had imposed on its land use review and IKEA has lived up to all of the conditions," said Hammerman.

    IKEA helped pay for turning lanes on Hamilton Avenue to ease the traffic flow in and out of Red Hook. Shuttle buses will pick up customers at nearby subway stations, water taxi service will run to and from Manhattan's Pier 11, two city bus lines are extending their routes to the store and rental Zipcars will be on-site.

    IKEA widened and paved the street in front of the store, upsetting some residents who wanted to keep the old stone road that was here. So, designers included the stones in the park landscape. The store also incorporated cranes to preserve the site's maritime history.

    And the Swedish company's outreach also extended to its hiring practices - giving local residents first shot at jobs which include full benefits for even part-time employees.

    "You watch it come from an empty warehouse into a showcase," said an employee.

    "Overall it's a good experience. I'm very excited to see the opening," said another.

    IKEA is still hiring – and opponents of the store may learn to embrace it, once it opens June 18.

    - Jeanine Ramirez

    EZ Furniture Assembly & Interior Innovations, LLC welcomes this move forward and will be happy to continue to be New York's #1 Furniture Assembly Service. Visit us www.ezfurnitureassembly.com

    Friday, April 25, 2008

    IKEA Elizabeth, NJ - Here are some great deals and Ideas!!

    If you are unable to see the message below, click here to view.

    Go to IKEA.com
    Send to a friend
    Tired of sifting through a pile of shoes to find just the right pair? Or searching for your favorite shirt in a closet or wardrobe stuffed with trousers, skirts and ... well, everything else? Getting dressed shouldn't be a chore. So whether you have closets or wardrobes filled with designer duds and accessories or drawers packed with lounge pants and sweat socks, the right storage solutions can help you put all your favorite clothes away — and easily find them later. More...

    Click here to see wardrobe storage solutions.
    Show me complete bedroom solutions.
    Ever have those moments when everything at home seems just right? Like when you open a drawer and find exactly what you wanted, right where you knew it would be. Kind of makes you feel proud.

    KOMPLEMENT interior organizers can help bring such moments to life time and time again. Some units divide drawer space into uniform compartments, and others allow you to make compartments of different sizes and shapes. Arrange socks, ties, or other small items in individual spaces so you can instantly see all of them. Every time you open a drawer, you'll want to congratulate yourself.

    Show me drawer storage solutions.
    What better place to watch a favorite movie, curl up with a good book — or a good friend — than your sofa? Whether your "spot" is the left cushion, the center or even the arm, the sofa is often the most sought-after seat in the living room. But it's also more than that. Its size usually makes it the center around which you decorate the rest of the room. It can set a tone that's comfortable, classy or simply cool. Either way, choosing the right sofa can make all the difference in the way you live in your living room. More...

    Take me to sofa solutions.
    Click here for more sofa options.
    Haven't decided on a gift for Mother's Day? Give the gift of choice with an IKEA Gift Card. Your mom will be proud of you for having such good taste. Submit a video of yourself making music using only kitchen items and win an awesome prize! Visit www.youtube.com/IKEA for your last chance to enter, OR vote for your favorite from the 10 finalists starting May 3. We know home is the most important place in the world. That's why we sponsored this new book filled with laughter, tears ... and hundreds of photographs by everyday people in their homes. Click here to preview America at Home.
    Furnishings help make a house a home. Tell us how you've used IKEA solutions to make your home better, and we may feature your story in a future issue. We have lowered the price of the HOSLE* wardrobe from $79.99 to $29.99. Now you can give your clothes an attractive space — and keep your budget looking good too. Click here to see more complete bedroom solutions. Attention, small business owners! Seeking creative display solutions for fall product lines? How about the perfect seating for your lobby? The new IKEA BUSINESS eNewsletter has tons of useful tips. Sign up for the IKEA BUSINESS eNewsletter today!


    Only 3.5% Sales Tax
    With IKEA Elizabeth's 3.5% sales tax, now furnishings are more affordable than ever. Plus, every Saturday and Sunday take advantage of our complimentary NYC shuttle from Port Authority to IKEA Elizabeth. (3.5% sales tax and complimentary NYC shuttle only at IKEA Elizabeth.) For details, call 1-800-BUS-IKEA.

    --------------------------------------------------------------------------------------------------------------

    IF YOU NEED PROFESSIONAL ASSEMBLY & INSTALLATION OF YOUR FURNITURE BY A LICENSED & INSURED COMPANY VISIT EZ FURNITURE ASSEMBLY & INTERIOR INNOVATIONS, LLC BY CLICKING HERE. WE SERVICE ALL 5 BOUROUGHS, LONG ISLAND, AND EASTERN NJ.

    About Me

    My photo
    I am a person who has had a rollercoaster of a life, with more downs than ups. I spent several years in marketing in which I started entry level and left Regional Marketing Director. I was blessed with a little princess and deiced my life needed an over haul so I started EZ Furniture Assembly & Interior Innovations, LLC with no more than a few screwdrivers, a shoebox of past due bills and a passion to succeed at something I found I really enjoy. Today I run NYC's top professional furniture assembly & kitchen installation companies, and am considered an expert in my industry.