I would like to tell everyone that I am very sorry for our absence from posting on the blog but due to changes within the company which included the expansion of our company we had to make decisions on what was more important at that time. However, I strongly believe that our readers are very important and now that we have hit calm waters I will begin to post on a regular basis on subjects that are interesting, informative, and helpful. I would love to hear from other people in our profession of construction, handyman, or assembly services that would like to be a regular contributor to our blog and our new newsletter we hope to launch in the near future.
Christopher C. Purnell
Reprinted with permission from Journal of Light Construction, January, 1999.
by Carl Hagstrom
I install about a dozen high-end kitchens a year, and have developed a system that prevents frustrating and costly backtracking. Since no two custom kitchens are the same, I have to tweak my approach to fit each situation, but many tasks I perform remain the same regardless of the kitchen.
Plumb Walls Are An Installer’s Best Friend
In my experience, the primary concern of most carpenters when they approach a kitchen installation is to find out if the floor is level. But what about walls that are plumb and square? I’ve found that in the overall scheme of cabinet installation, the order of importance is: plumb, square, and level.
When walls are plumb, I can make good time. I position the cabinet in place, screw it to the wall, and move on. When walls are not plumb, I’m forced to fuss with shims. Judging the right amount of shim to shove behind a cabinet is a matter of trial and error. I take my best guess, suck the cabinet tight to the wall, check for plumb, and then loosen the screws and adjust the shim until the bubble falls between the lines. It’s not difficult, but it is tedious.
Walls that lean away at the top are the most problematic — you have to shim the tops of the uppers, which is a tough reach. When a wall leans in, I can hang the upper from the top rail, then slip shims behind the lower portion of the cabinet.
Base cabinets can be even tougher in this situation. If the wall leans out, the base cabinet is forced out of plumb when it’s drawn tight to the wall. You then loosen the screws, the cabinets drop from the line, you cuss and swear, and then try and hold the cabinet to the line while gauging how much shim has to go in behind it. And then there’s a gap at the exposed end of the run where the plumb cabinet meets the out-of-plumb wall. This must be covered with a molding or a scribed end panel.
Square walls.
If a prefabricated laminate countertop is specified and the plan calls for an inside corner, I pay close attention to the squareness of the walls. Prefab counters that are mitered for inside corners install square. If the walls are out of square, there will be a gap where the backsplash meets the wall.
In production work, this gap is closed off with a molding. In higher end work, this is often unacceptable. Prefabricated counters can be special ordered to fit an out-of-square condition, but lead times are long.
Levelness affects appliances.
When the floor is out of level, I typically start the layout from the highest point. Many appliances won’t fit in their opening if the counter is less than 34 1/2 inches above the finished floor. Starting at the high point usually avoids this problem.
Laying Out Cabinet Locations
At any rate, the first things I check are the walls. I prefer to use a 4-foot level for this process (see Figure 1). Unlike a construction laser, my bubble stick lets me know right away when there’s a hump or bulge in the wall or floor. To those who argue that a 4-foot level isn’t accurate enough, I counter that accuracy is relative. A kitchen must be straight and flat — being 1/4 inch out of level overall will seldom affect the job. My goal is to find the high point of the floor and work from there. That way, I know right away if I’ll be working late.
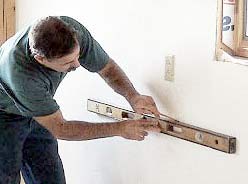
Figure 1. While a helper unloads the truck, the author uses a 4-foot level to check the walls and floor. A level is better than a construction laser for finding bumps and dips in the wall — and plenty accurate for a kitchen installation.
After sizing up the walls and floor, I draw a level line on the wall at 34 1/2 inches from the highest spot on the finished floor (Figure 2). If the finished floor hasn’t been installed, I add its thickness (plus any underlayment) to the 34 1/2-inch dimension. Since most countertops are 1 1/2 inches thick, setting base cabinets to this height results in a finished counter height of 36 inches. Then I measure up 19 1/2 inches from this line, and draw a second line, which represents the bottom of the upper cabinets. If these dimensions seem at all confusing, just remember that finish counter height is 36 inches, and the distance between the counter and the upper cabinets is 18 inches.
Next, I mark out all the upper and lower cabinet locations on the walls. These aren’t precise layout marks, but they let me size up the cabinet placement, and review the layout for potential problems.
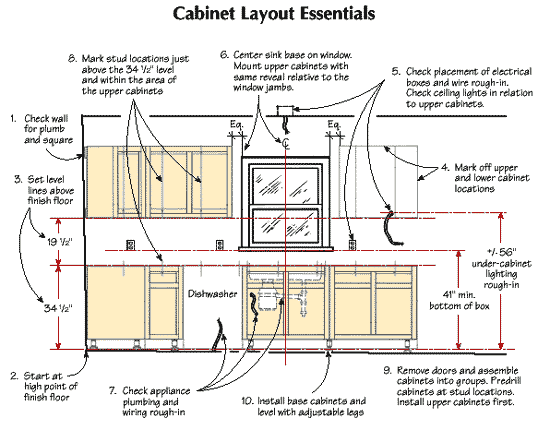
Figure 2. One hour spent laying out the job can save many hours of backtracking later. Check walls for plumb and square, and floors for level. Locations of all cabinets, plumbing, and wiring must be verified, and every cabinet should be checked against the plans — before installation begins.
Electrical placement.
The most common snafu I encounter is improperly placed or missing outlets and switch boxes. Moving or adding a device box before the cabinets are installed isn’t so bad — the “hack tracks” in the drywall can be easily hidden behind the cabinets.
The bottom of a device box should be at least 41 inches from the finished floor, and the run of device boxes should be level. If the electrician measured from an out-of-level subfloor when he set the boxes, they’ll need to be relocated. I also check for an outlet where the refrigerator is located, and for a feed wire for the exhaust hood. Unless the joists are open below, the feeds for ranges, ovens, dishwashers, and garbage disposals should be in place as well.
I also check the layout of any ceiling or soffit lighting. These lights are typically placed 16 inches or so from the wall, and can present a problem if they fall within the area of a 24-inch-deep overhead refrigerator cabinet, wall oven, or pantry.
Checking for symmetry.
The majority of kitchens I install have a sink base that’s centered on a window. In these situations, I use my layout marks to verify that the cabinet will end up centered, and that the upper cabinets on either side of the window will show the same reveal relative to the window jambs.
Proper piping.
I check that drain lines, supply lines, and toe-kick heaters are located properly. Finally, I use an electronic stud finder, and mark where all the studs are. I draw vertical stud lines within the area of the upper cabinets, and place a mark just above the 34 1/2-inch base cabinet level line.
The entire layout process takes about an hour, and once completed, allows me to focus on installing. My helper unloads and sets up tools while I do the layout. The last item on my list is verifying that all the cabinets are on site, and that they match the plan dimensions.
The Easy Way to Hang Cabinets
I’m not lazy, but I don’t like working any harder than I have to. I try to do as much work as possible before the cabinets are hung. As soon as the cabinets are unloaded, my helper or I remove the cabinet doors. Many of the doors must be removed for clamping purposes, but more importantly, it eliminates the risk of a door being damaged as the cabinets are installed.
Uppers first.
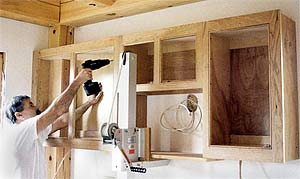
I always install upper cabinets first. They’re easier to install when I don’t have to reach over installed base cabinets, and there’s less chance the base cabinets will be damaged. I lay the uppers on their backs on the floor, and assemble them as a group (Figure 3). I clamp the face frames together, drill pilot holes, and then screw the face frames together. When the entire “block” of cabinets is fastened together, I lay a straight-edge on top of the face frames, then shim between the floor and the backs of the cabinets until everything is flat. Then I shim the spaces between the sides of the cabinets and run screws through the sides at the back of the cabinets to lock them together as a unit.
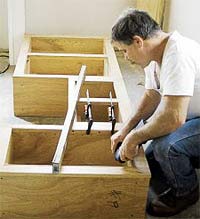
Figure 3. The author assembles the upper cabinets on the floor as a unit, shimming from the back until the fronts are straight and flush. Note the level used as a straightedge.
I use Fuller countersink bits (W.L. Fuller, P.O. Box 8767, Warwick, RI 02888; 401/467-2900) to drill all the pilot holes. They’re inexpensive (around $5 each), use standard twist drill bits, and are easy to adjust for length. I use square-drive screws (McFeely’s, P.O. Box 11169, Lynchburg, VA 24506; 800/443-7937) for all fastening chores. The square drives have a thicker shank than drywall screws (less chance of snapping them off when working with hardwoods), and the screw heads don’t strip out as easily as Phillips head screws.
Predrilling for stud locations.
After I’ve fastened the cabinets together, I stand them up and lay out the studs on the back of the cabinets (Figure 4). I then drill from the back of the cabinet through the hanging rail (at the stud lines), until the drill bit just pokes through to the interior of the cabinet. I finish the pilot holes by countersinking from inside the cabinet. This method is much more foolproof than laying the pilot holes out from the interior of the cabinets, since it eliminates the need to deduct for cabinet sides.

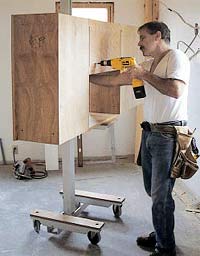
Figure 4. Marking stud locations on the backs of cabinets is easier than marking them inside (top). The author predrills holes for the mounting screws from the back (bottom), then finishes up with a countersink bit from the inside.
My next step is to get the block of cabinets in position on the wall. About two years ago, I was introduced to an amazing tool: the Gil-Lift (Telpro, Rt 1, Box 138, Grand Forks, ND 58201; 800/441-0551). This is a dedicated cabinet lift that allows me to lift up to 300 pounds of cabinets single-handedly and roll them into place. The lift mast removes easily from the dolly, which I use to move base cabinets around. Forget the leveling lasers: If you install any kitchens at all, a Gil-Lift is one tool you shouldn’t be without. I figure it took me about four kitchens to recoup the $475 cost of this lift.
If you don’t have a cabinet lift, then the size of the block of cabinets you assemble will be determined by the number of people available to help lift the assembly in place. Before I had a lift, I would fasten temporary supporting brackets to the wall. With these brackets, I could fasten the block of cabinets to the wall without the need for an extra pair of hands to hold them up.
Undercabinet lighting.
At this stage, if there is any undercabinet lighting, the feed wires must be fed through as the cabinets are positioned. A good electrician will leave a loop of wire 56 inches above the finished floor. It’s better to locate this wire too high rather than too low. I cut a trough through the drywall and lower the wire to its proper height (Figure 5). If the wire is too low, the wall will have to be patched after the wire is raised. I drill a 5/8-inch hole in the back of the cabinet just below the bottom shelf and feed the wire through as the cabinets are lifted in place.
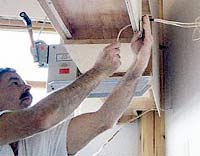
Figure 5. Wires for under-cabinet lights are roughed in at a safe height behind the wall cabinets. The author then slices the drywall to bring the wire down to the correct height at the bottom of the cabinet.
Base Cabinet Basics
When all the uppers are in place, I install the base cabinets. Base cabinets come in two flavors: those with integral bases forming the toe kick and those without.
Base cabinets with integral toe bases are typically moved into position, the face frames are fastened together, and the rear hanging rails are held to the level line and fastened to the studs. Then the cabinets are leveled front to back using shims slipped under the toe bases. If you didn’t establish your layout line from the floor’s high point, you’ll be hacking away at these integral toe bases to adjust the cabinet to the rising floor.
Most of the cabinets I install do not have toe bases. Originally, the cabinetmaker I work with supplied plywood base frames that the cabinet boxes would sit on. I would level the toe base frames, set the cabinets on top, and screw the hanging rail to the studs. This made for a lot of work on my knees, and if the cabinet needed to be shifted left or right, the locked-in-place toe frames often had to be relocated. After rethinking the process, I now use adjustable feet called leg levelers. They fasten to the underside of the cabinet, and the threaded portion of the foot is extended or retracted by turning the base of the foot (Figure 6). The leg levelers we use cost about $1.50 each. They’re made by Camar and are available through kitchen component suppliers.
A typical kitchen might require $50 to $60 worth of leg levelers. The additional cost is more than offset by the elimination of the toe frames, and the labor savings when leveling the cabinets. Finish toe boards attach to the feet with spring clips, and can be removed to access wires or piping.
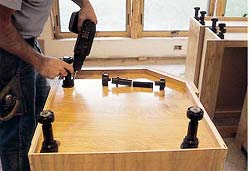
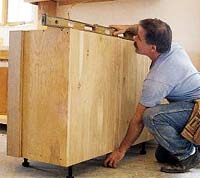
Figure 6. Plastic leg levelers (top) speed the task of leveling base cabinets (bottom). Finished toe kicks attach with metal clips — or can even be screwed directly into the plastic legs, according to the author.
New Clamp in Town
Aligning and clamping face frames can be tedious. For years, I’ve used Bessey clamps for this task (American Clamping Corp., P.O. Box 399, Batavia, NY 14021; 800/828-1004). Their smooth action makes for a first-class clamp. I’ve recently added a new clamp to my bag of tricks, a dedicated face-frame clamp called the Cabinet Claw, by Pony ($50 per pair, from Adjustable Clamp Co., 417 N. Ashland Ave., Chicago, IL 60622; 312/666-0640). This dual-action clamp simultaneously pulls the face frames together and flushes them up (Figure 7). While these clamps can’t replace my Bessey clamps for every task, for face-frame work they’re well worth the cost.
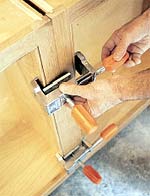
Figure 7. Pony “Cabinet Claws” are the newest weapon in the author’s installation arsenal. They draw the cabinets together and keep the face frames perfectly flush at the same time, acting like an extra pair of hands.
Carl Hagstrom is a contributing editor for the Journal of Light Construction, and a builder in Montrose, Pa.
Reprinted with permission from Journal of Light Construction, January 1999. Subscription information can be found at their website: www.jlconline.com.
Have you reviewed the related Knowledge Base areas below?
KnowledgeBase: Cabinetmaking

KnowledgeBase: Cabinetmaking: General
KnowledgeBase: Cabinetmaking: Installation
KnowledgeBase: Cabinetmaking: Residential Cabinetry
KnowledgeBase: Knowledge Base
Would you like to add information to this article? ... Click Here
If you have a question regarding a Knowledge Base article, your best chance at uncovering an answer is to search the entire Knowledge Base for related articles or to post your question at the appropriate WOODWEB Forum. Before posting your message, be sure to review our Forum Guidelines.
Questions entered in the Knowledge Base Article comment form will not generate responses! A list of WOODWEB Forums can be found at WOODWEB's Site Map.
When you post your question at the Forum, be sure to include references to the Knowledge Base article that inspired your question. The more information you provide with your question, the better your chances are of receiving responses.
Return to beginning of article.
